Author: Christian Wittern, Taipei -- Created: 00-01-07, Last change: 00-01-09
URL of this document: http://www.chibs.edu.tw/~chris/smart/editxml.htm
Technical note:
SGML/XML editing with plain text editors
Abstract
Setup of SP
Setup of UltraEdit
Setup of Textpad
Abstract
Lacking sophisticated and achievable SGML/XML capable editors suitable for editing of East Asian texts, it is feasible and possible to set up an editing environment with popular and powerful shareware editors. These editors can be downloaded from the Internet and used for a limited period free of charge. A licence fee has only to be paid for continued use. The two editors discussed here, UltraEdit Professional Text/HEX Editor Version 7.00a (available from www.ultraedit.com) and TextPad 4.1 (see www.textpad.com) are rich in features, with no clear front-runner. UltraEdits most recent version is capable of reading Unicode text files and seems to use Unicode as its internal encoding. There are still problems with codepoints outside the current codepage, but this gives UltraEdit a slight advantage over TextPad, whose most recent version introduces support for double-byte encodings and ships a version with Japanese user interface. In this technical note, I will discuss how to set up these editors to edit and validate SGML/XML text files.
Setup of SP
SP is a very powerful SGML/XML parser written by James Clark. It is freely available from www.jclark.com. You can click here to download the latest version (1.34) for windows. After downloading the file, extract it to C:\SP, but keep the directory structure intact. (You can download it to any other place, but the scripts here assume it to be here, so better put it here:-)
To use SP for xml files, it is best to set up some environment variables. With this in place, SP will determine the encoding of the files you use from the xml file, which gives you a very flexible setup. To achieve this, add the following three lines to the file C:\AUTOEXEC.BAT
SET SP_CHARSET_FIXED=YES
SET SP_ENCODING=XML
SET SGML_CATALOG_FILES=C:\SP\PUBTEXT\XML.SOC
With this in place, you are ready to set up your favorite editor, skip to the editor you plan to use.
UltraEdit Professional Text/HEX Editor Version 7.00a
To setup UltraEdit, please download this archive. Extract all the files and put them in the directory C:\SP\BIN (that is, to the same location as the file nsgmls.exe).
The batch files parsxml.bat and parssgml.bat have a reference to the absolute filename of nsgmls.exe. They assume it to reside in C:\SP\BIN. If you put it somewhere else, you have to change the pathnames.
Now open UltraEdit and find the menu entry Advanced/Tool Configuration. It should look similar to this:
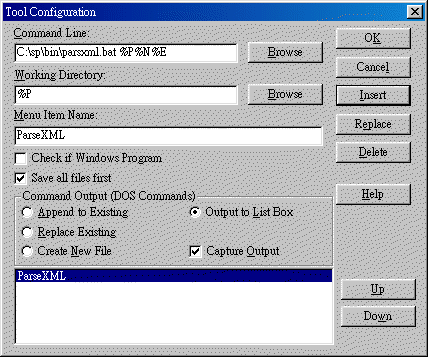
Enter information as in the above picture:
Command Line:  C:\sp\bin\parsxml.bat %P%N%E

Working Directory: %P

Menu Item Name: ParseXML
Also, check the "Save all files first" box and "Output to ListBox" and "Capture Output". Finally click on the insert button to save these settings. You should now have a new entry on the Advanced menu which says "ParseXML". If you want, you can do the same for SGML files, just use the parssgml.bat file instead.
You can invoke the parsing process with the keyboard by pressing Ctrl+Shift+0. If you like using the mouse, you can also create a button on the toolbar: In the Advanced/Configuration menu, select the tab "Toolbar". Go down in the list on the left side and find User Tool1. Now move the insertion point on the right side down to the last entry and then press insert and OK. You will now have a new icon with a little hammer on it and the number 1, this indicates it is the first User Tool you installed.
Ultraedit should now be setup to parse xml files. Just load a file and invoke the parsing process. If you have errors in the file, they will be reported in a new section, that opens in the lower third of the screen. Just click on any error line and UltraEdit will jump to the line in the file.
You can also setup some syntax highlighting. This makes it easier to distinguish markup from text. To do this, find the file Wordfile.txt in UltraEdits programm directory. At the end, please add the following lines:
/L6"SGML" Nocase Noquote HTML_LANG Block Comment On =  File Extensions = SGM SGML DTD XML
/Delimiters = ~!$%^*()-+=:;"'<> ,	.?
/Function String = "fun=*">"
/Marker Characters =
/C1
After this, you should add the elements you are using. Order them alphabetically, and begin a new line with every new letter. Due to some old bug in UltraEdit, you will have to enter a tag with the angled brackets and separately with the end delimiter. If it can take attributes, also enter it without the closing bracket at the start tag:
<CORR <CORR> </CORR>
You will find an example of the Wordfile.txt used in my project in the archive mentioned above.
Textpad 4.1
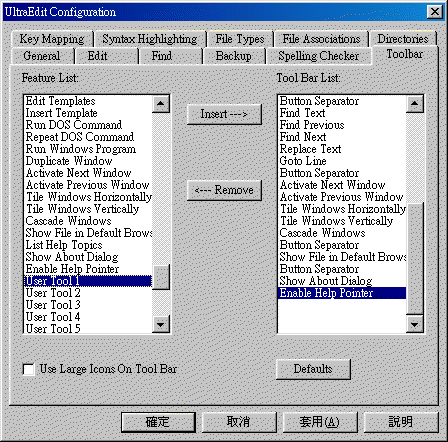
To setup Textpad for parsing SGML/XML files, first download this archive (2k). You will find a subdirectory called User there and some files. The files in the User directory should be copied to TextPads User directory, usually at C:\Program Files\TextPad 4\User. Then doubleclick on the file txp4-xml.reg. This should set up TextPad for use with SGML/XML files. You should now have two new entries in the Tools menu: ParseSGML and ParseXML. If you like to use the mouse to invoke the parser, please go to the menu View/Toolbars/Customize. Click on the Commands tab and select tools. You will see a dialog similar to the following:

Now simply drag the first two hammers to the toolbar where you want to put them.
Syntax coloring is also possible, it has already been set up under the document class CBETA, with those tags I used so far. If you want to change the settings, or add some elements, open the file CBETA.SYN and go ahead:-)
After a parsing process finished, errors found are displayed in a separate window called Command Results. Clicking on any entry there will bring you to the line in the text file where the error occurred. Contrary to UltraEdit, TextPad will move to the exact location, including the column, which is very convenient if the lines are long. The error message is displayed in the status line. Subsequent errors can easily be located by pressing the key F4 or selecting Jump next from the Search menu. In the location and correction of errors, TextPad has thus a slight advantage over UltraEdit.
Please direct any questions or comments on this page to Christian Wittern, email: chris at ccbs.ntu.edu.tw
Back to the SMART startpage
Last modified: 00-01-07